Sunday, December 19, 2010

Eggnog Cupcakes

For me, one of the true marks of the holiday season is eggnog. So naturally when I needed to make cupcake for my office holiday potluck, eggnog cupcakes came to mind. For this particular cupcake adventure, I decided that I wanted to modify a cake mix instead of trying everything from scratch. This way I could save a little time, and cash.

Thanks to some extensive Google research, I found an eggnog cake recipe that uses a mix.

Here is the recipe that I followed, modified slightly to be made as cupcakes.


Ingredients:


* 4 ounces butter, softened
* 1 cup eggnog
* 1/4 cup rum
* 1 teaspoon ground nutmeg
* 2 teaspoons vanilla
* 3 large eggs
* 1 package vanilla cake mix

Preparation:
Heat oven to 325°.

Beat butter until light; beat in eggs and eggnog and rum. Add vanilla, nutmeg, and cake mix; beat slowly to combine, then beat on high speed for 2 minutes. Spoon into cupcake liners. Bake for 15 to 18 minutes.

The batter tasted to delicious!!

The frosting was kind of my own invention. I just wanted to make a simple cinnamon buttercream frosting. I used two sticks of butter, about 3 cups confectioner's sugar, 3 tablespoons of eggnog, 1 teaspoon vanilla extract, and 1 teaspoon of cinnamon. I tend to add things to my frosting depending on how it tastes. For this particular one, I think I ended up adding a little more vanilla which then required me to add some more confectioner's sugar so it wouldn't get too runny.

So of course I was making these cupcakes at the last possible second because I was trying to get out the door and make it on time for work. Unfortunately, I was a bad little blogger so I didn't take any pictures.

Here is an example of how I wanted them to look:
source: living artfully


In all honestly, my cupcakes were not decorated with love. My last frosting bag busted, so I had to frost them old school with a spatula. I did, however, throw some red and green christmas sprinkles on there to help add some color.

Enjoy!

Tuesday, December 7, 2010

First Crafty Wedding Purchase

On Friday night while my husband-to-be was going to town on his new XBOX 360, I was struck with the random urge to research ideas for my wedding table numbers. Throughout this entire wedding planning process, Google Images, has truly been my best friend.

I found so many great and creative ideas, but there seems to be a lot of hype about the Tolsby Frame from IKEA (pictured below).
Here are some examples of it in action:

source: ruffled
(p.s. - if you are in love with this format, you can download the template from ruffled!)
I really like the idea of the menu on the back as opposed to printing one out for each place setting. I hate wasting paper!

source: GatorBrideDesigns

In her etsy listing, GatorBrideDesigns also shows examples of using this frame at your guestbook table and for listing info about the signature drink. Love that idea!

So because I can't wait for ANYTHING, I spent my Saturday afternoon taking a little trip to my "local" IKEA in Stoughton, MA. The car ride isn't that far, but it was filled with a lot of "I think we should've turned back there..."

Into my blue IKEA shopper tote went twenty Tolsby frames. I can't wait to get started!


Saturday, April 10, 2010

A week in review...

Oh last week was so hectic! Even though I had quite a lot going on, there is always time to be crafty...

Last Monday, my mother and I were in the car and we happened to pass by a wicker armoire that someone was throwing out. It was sitting on the curb all lonely and abandoned, so we rescued it. It really was the moral thing to do. Eight, yes I said eight, cans of white spray paint later and voila! I ditched my old broken bureau and I now was a fancy armoire.

P4070026
Please don't mind the mess around it. The photo was taken before I finished cleaning and rearranging my room. Which by the way, made me realize that I'm a HOARDER!

Here's another inside shot. I haven't hung up any clothes yet, but there's potential.
P4070027

Unfortunately I forgot to take some before pictures, but originally the paint was all chipped and it was a very dingy, yellowed color.

The next crafty thing of the week was a gift. My wonderful boyfriend bought me What's New Cupcake by Karen Tack and Alan Richardson.


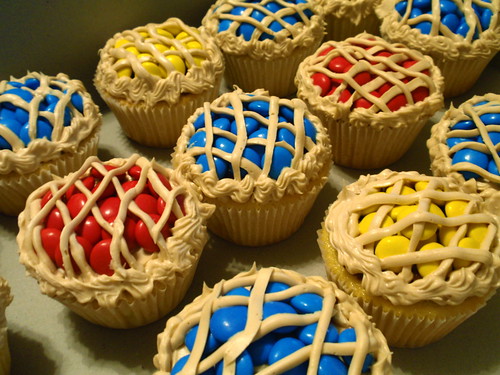
It's an amazing book with so many really cute ideas. On Friday I decided to make one of the designs that were classified as "EZ," meaning they were not only relatively simple, but they also only needed a few ingredients. The cupcakes that I made used M&M's to look like bake sale pies. My only regret is that I forgot to buy silver foil cupcake liners, as recommended by the book.

P4090039

The book recommends cutting the corner off of a ziplock bag and using that to pipe the "crust" around the pie. I couldn't quite get the hand of it, so I cheated and used a star tip and a pastry bag. However I did use the ziplock bag method for the lines across the pie.

Instead of buying a bag of M&M's in a single color, which were really pricey, I went with two bags of the regular kind. I did get to spend some fun time separating the candy by color into bags.

Enjoy my cherry, blueberry, and lemon pies!

P4090037

Sunday, April 4, 2010

happy easter!

I woke up in the wee hours of the morning to make easter cupcakes. I found my inspiration in one of my favorite crafty baking books, Hello Cupcake by Karen Tack and Alan Richardson.


I settled upon the design called "Rabbit Holes." The directions seemed pretty clear and I already had a lot of the candy needed, which was a major plus! One odd thing was that the directions called for white circus peanuts, which apparently do not exist anywhere, only at some obscure online retailer. I bought orange circus peanuts instead and dipped them in white chocolate (which I thinned out a little bit with shortening after my chick pop experience).

Here are the fruits of my labor:
P4040022

For the toes, the book called for chocolate covered sunflower seeds. I used mini chocolate chips instead.

Here is a closeup of the "grassy" cupcakes. I originally piped the frosting to look like grass, but it was too soft and got all droopy. (I bought "whipped" frosting by mistake). Luckily, I had some shredded coconut that saved the day and looked like grass.
P4040021

The whole process of baking, decorating, and clean up took about three hours. And by cleanup, I mean putting almost everything in the dishwasher!!!

P4040019

Happy Easter!

Thursday, April 1, 2010

The greatest invention!

This morning while I was catching up on my blog reading instead of spring cleaning, I found the greatest DIY project of all time.

source: the long thread
The directions are clear, concise, and it's a great way to destash!


Happy April Fool's Day!

Wednesday, March 31, 2010

Easter Cake Pops

As I was searching for something fun to make for Easter, I decided to search on one of my favorite blogs, bakerella. I stumbled across her signature "cake pops" and decided to have a go at it.

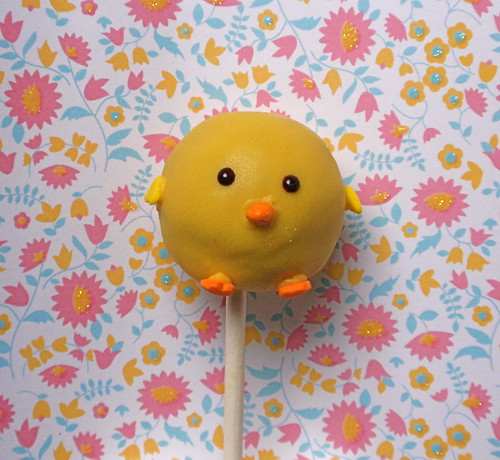
On her site, there are several to make that are kind of springy and Easter-y, so I decided on the chicks. Bakerella's beautiful chicks can be viewed here.

So late night in the "flood conditions" that are plaguing New England, I make the long drive to A.C. Moore for some melting chocolates, lollipop sticks, and decorations. Bakerella recommended candy coated chips (nose), multi-colored diamonds (wings) and pastel wild flowers (feet). I was able to find the candy coated chips and I ended up purchased a Wilton sprinkle assortment for the other features on the chick.

Late last night I baked a Duncan Hines Chocolate cake, and after it cooled I broke it up and mixed in a can of chocolate frosting. My mother helped me roll the mixture into 1-inch balls, and this was such a messy job. Our hands were covered in cake and frosting and it was not an enjoyable experience.

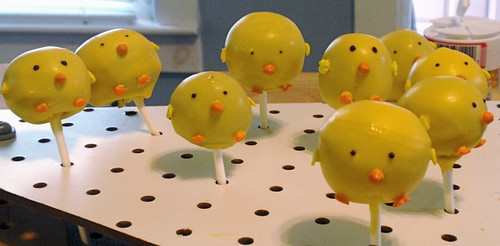
This morning I melted the yellow chocolate and started to dip the cake balls. This process did not go as smoothly as I thought it would. It was incredibly difficult to get the chocolate to evenly coat the cake ball. I think I need to read some more directions and watch some more youtube videos for tips.

P3310004
As you can see, we suffered some casualties...


P3310006
Here's a group shot of the surviving chicks


Here are some pretty pictures using Die Cuts With a View "Sweet Stack" as a backdrop.
P3310014

P3310013


Tuesday, March 30, 2010

Spread the word!


During the month of April, April Showers Blog Design is going to be giving away tons of stuff, I'm talking giveaway pandemonium!

Check it out and cross your fingers. You just might snag something cool! I would love, love, love to win a blog design, because her stuff is awesome.

Sunday, March 28, 2010

Recipe: Tiramisu Cake/Cupcakes

Tiramisu is my absolute, all time, hands down, favorite dessert! I just love everything about it. The flavors, the textures, the caffeine... (I'm a coffee junkie, by the way).

On Saturday nights, we have "dessert night" at the place I work. The lucky baker this week made tiramisu cupcakes. They were so delicious that you couldn't eat just one. The cake was very light and fluffy which complimented the rich filling and frosting.

I was dying to get my hands on the recipe. I wondered if my coworker had some fancy cupcake book that I would begin to obsess over. NOPE! The recipe was printed in Wednesday's newspaper.

I very happily found it on my local newspaper's site. It so happens that the recipe is from "The Cake Mix Doctor Returns" by Anne Byrn. Because I am never content, I googled this Anne Byrn and saw that her books have a ton of reviews on Amazon.com. I need these books!!! Although I recently enjoyed making cupcakes from scratch on St. Paddy's day, sometimes tweaking a cake mix would be so much more convenient.


Also, I do not yet have my highly coveted Kitchen Aid Mixer which would make "from scratch" baking much more palatable.


So here is the recipe. My coworker only modified by making cupcakes inside of a round cake. I can't wait to make these myself! Also, these lovely confections caught me off guard this evening, so I did not have my handy dandy purple camera at the ready, so I will be sure to post pictures of the finished product when I make these on my own.

Recipe: Tiramisu Cake

For the cake:
Vegetable oil spray, for misting the pans
Flour, for dusting the pans
1 cup water
2 tablespoons instant coffee granules
1 package (18.25 ounces) plain chocolate cake mix
2/3 cup reduced-fat sour cream
3 large eggs

For the frosting:

2 cups heavy (whipping) cream (divided use)
1 tablespoon instant coffee granules
1/4 cup granulated sugar

For the filling

8 ounces mascarpone cheese, at room temperature
1/4 cup marsala wine or cream sherry
1/4 cup granulated sugar

Make the cake:
Place a rack in the center of the oven and preheat the oven to 350 degrees. Lightly mist two 9-inch round cake pans with vegetable oil spray, then dust them with flour. Shake out the excess flour and set the pans aside.

Bring the water to a boil and stir in the 2 tablespoons of instant coffee until it dissolves. Set the coffee water aside to cool for 5 minutes.

Place the cake mix, sour cream, eggs, and cooled coffee water in a large mixing bowl and beat with an electric mixer on low speed until the ingredients are combined, 30 seconds. Stop the machine and scrape down the side of the bowl with a rubber spatula. Increase the mixer speed to medium and beat until the batter is thick and combined, 1-1/2 minutes longer. Divide the cake batter evenly between the 2 prepared cake pans, smoothing the tops with the rubber spatula. Place the pans in the oven side by side.

Bake the cake layers until the tops spring back when lightly pressed with a finger, 25 to 30 minutes.

Meanwhile, make the frosting: Place a large mixing bowl and a clean set of electric mixer beaters in the refrigerator to chill. Measure 1/4 cup of the cream into a glass measuring cup and place it in a microwave oven on high power until hot, 30 seconds. Stir in the 1 tablespoon of instant coffee until the coffee dissolves. Place the coffee and cream mixture in the refrigerator to cool.

Transfer the cake pans to wire racks and let the cake layers cool for 5 minutes. Run a sharp knife around the edge of each cake layer and give the pans a good shake to loosen the cakes. Invert each layer onto a wire rack, then invert it again onto another rack so that the cakes are right side up. Let the layers cool completely, 20 minutes longer.

Remove the chilled bowl and beaters from the refrigerator. Pour the remaining 1 3/4 cups of cream into the bowl and add the 1/4 cup of granulated sugar, and the cooled coffee and cream mixture and beat with an electric mixer on high speed until stiff peaks form, 2 minutes. Measure out 1-1/2 cups of this coffee whipped cream, place it in a medium-size bowl, and set it aside. Refrigerate the remaining whipped cream mixture for the frosting.

Make the filling: Add the mascarpone cheese, marsala or cream sherry, and 1/4 cup of granulated sugar to the bowl with the reserved 1-1/2 cups of coffee whipped cream mixture. Mix well with a wire whisk until smooth.

To assemble the cake, using a long, serrated knife, carefully slice each cake layer in half horizontally to make 4 layers. Or, don’t slice the layers in half and make a 2-layer cake. Suit yourself (see note). Place the bottom half of one layer cut side up on a cake plate and spoon 3/4 to 1 cup of the filling on top, spreading it evenly to the edge. Place the top half of this layer, right side up over the filling. Add another 3/4 to 1 cup of filling and spread it to the edge. Place the bottom of the remaining cake layer on top and spread it with the remaining 3/4 to 1 cup of filling. Place the top half of the second layer, right side up, on top of the filling. Remove the frosting from the refrigerator and spread it on the top and around the side of the cake.

Keep It Fresh! Store this cake, in a cake saver, in the refrigerator for up to four days. Freeze only the layers, wrapped in aluminum foil, for up to six months. Let the layers thaw overnight on the counter before making the frosting and filling and assembling the cake.

How to garnish tiramisu

The traditional topping for tiramisu is unsweetened cocoa powder. Along with a dusting of cocoa either unsweetened or sweetened-you can also garnish this cake with a little cinnamon or shavings of dark chocolate. Any way you garnish it, it is delicious.

Note: If you decide to make this a 2-layer cake, you’ll need less filling. Just divide the measurements in half.

From Anne Byrn’s “The Cake Mix Doctor Returns”

Enjoy...

Tuesday, March 23, 2010

mini blog makeover

As I read through the countless blogs out there, I started to realize that I had "blog envy." So many blogs have such beautiful headers/banners, backgrounds, sidebar titles, etc. Being the way that I am, I started to research custom blog design. I looked through portfolio after portfolio, and there are soooooo many talented graphic artists and blog designers out there.

Due to a slight problem in the self control department, I needed to restrain myself from purchasing a fancy custom design package. Boy did I want one, I still want one! However I made a pact with myself, that perhaps once I get some readers and establish my blog a little further, then I can go nuts with some custom design.

So for now, I'm going to make due. By making due, of course I mean dabbling with some HTML coding and tutorials. What kind of DIY-er would I be if I let things alone?

After a lot more googling, I came across some wonderful resources.


April Showers Blog Design

April not only custom designs gorgeous blogs, but she also lists several helpful tutorials that can help you make your blog awesome. I used her tutorial to turn my blog into three columns, and I also used it to tweak borders.

Sneaky Momma Blog Design

This blog features TONS of tips and tutorials! You can find out how to customize many different aspects of your blog using these very easy to follow directions. The best part is that new posts feature new tools and tricks. Today I read the post about a firefox add-on called Colorzilla that finds the HTML color code for whatever you click on. I downloaded this add-on this morning and used it to find colors that matched my header.

Speaking of headers, mine is new. For this, I broke down and paid for a custom design. In my defense, I did try to make one using Picasa, however I wasn't really happy with it. I ended up finding Jacq & Mal on etsy. The prices are super reasonable and this seller is great to work with.

I'm so in love with my new banner...

Wednesday, March 17, 2010

happy st. paddy's day!

As an individual with a smidge of Irish heritage, I decided to be festive. I donned my green sweater, green earrings, and obnoxious green argyle socks. I also wanted to make a fun and festive treat to share with my coworkers. I did some searching and just by pure Irish luck, I stumbled upon a recipe for "Chocolate Whiskey and Beer Cupcakes" from smitten kitchen. Other websites and blogs also refer to them as "Irish Car Bombs" after the cocktail.

So I diligently made my shopping list and I trekked over to the grocery to get all my essentials. I wanted my cupcakes to taste yummy, so I forked over the extra $.75 for the "good" chocolate. Sadly, my local craft store didn't have any St. Patrick's Day cupcake liners, so I was forced to go with plain white, but I grabbed some green sugar sprinkles to dress them up a bit.

Early this morning, I was ready to start my baking. I pulled my hair back, put on a special apron, and gathered all my bowls and ingredients. I even turned on the Food Network for some baking inspiration. I read through the beginning parts of my recipe and it suddenly dawned on me that I have never made a cake or cupcakes from "scratch" before. I usually rely on my best buds Betty Crocker or Duncan Hines.

At this point I was really nervous. What if the cupcakes were dry and dense? Yuck! The recipe had a lot of positive comments, so I thought that hopefully if I followed the directions to the letter, everything would turn out fine.

After three and a half long hours, I baked 20 cupcakes, cut out their cores, filled them with chocolate ganache, and then piped on the buttercream frosting. Behold the fruits of my labor:

st. paddy's day cupcakes


I think they came out rather pretty! These cupcakes were my first try at piping frosting, and they don't look to shabby. I used a Wilton #12 tip for both the ganache filling and the frosting.

The only changes that I made to the recipe were that I baked the cupcakes for about 20 minutes, and instead of regular Bailey's Irish Cream, I used the "coffee-flavored" variety because that's all the liquor store had in nip size.

I definitely recommend this recipe. Those cupcakes were scrumdiddlyumptious, if I do say so myself.

Top of the mornin' to you!

Tuesday, March 16, 2010

embroidery hoop art

My project of the day was to figure out what to do with a seriously blank and boring wall in my bedroom. A trip to IKEA over the weekend proved unsuccessful, as the wall art that I wanted was a little bit too expensive for my budget. Well maybe I could've afforded the one I really wanted if I committed to eating peanut butter sandwiches for the rest of the week...

As if by fate, I was perusing through an oldish issue of Country Living and I saw a viable option, embroidery hoops! What makes it even better, is that I have quite a bit of fabric scraps in colors that would compliment my bedroom.

I found this great tutorial from the purl bee, and I learned that these are also called "swatch portraits". I did a little more research and found that some people also use felt or muslin to back the fabric if it is too thin or translucent.


My inspiration rooms:
image: countryliving


image: micassid


image: DesignsbyNancyT


image: jupiter buttons


image:lara cameron


image: the workroom


image: contentedsparrow


image: fnur


I love the rooms where the hoops are in a variety of sizes. I did some scoping out on ebay and I purchased 6 embroidery hoops for just under five bucks. Oh I hope the mailman comes fast...

Thursday, March 11, 2010

a new project....

So today I got a postcard in the mail advertising Vera Bradley's new "Cha Cha Handbag."
photo credit: vera bradley

I totally love it! It's ruffly and girly, so naturally I must have one. The only downside is that the list price on the bag is $58. What's a DIY girl like me to do?
Since I also have a love of aprons, I remember coming across a tutorial for a ruffled apron.
photo credit: one more moore


I think if I can build off the apron tutorial, I can draft a pattern for a mock "Cha Cha Handbag." Get to go shopping for fabric!

Tuesday, March 9, 2010

53 pieces...

Let me preface this post by saying that when it comes to sewing, I would rather get in there and start sewing and skip all the prep work. I hate to prep, to cut, to fuse, etc.
After my crafty excursion to the Franklin Mill store, I sat down and read through the directions for the "Sweet Harmony Handbag" pattern. Needless to say, it required a lot of prep work.

For projects like this, I wish that I had a spectacular craft room, equipped with a cutting surface. Maybe if I had a craft room, actually a studio like this, all my cares in the world would disappear.


source: jenny b. harris


Now I fear that I'm becoming distracted, dreaming of my future craft room. Maybe I should first aim for moving out of my parents' house, then worry about craft room bliss.

So anyway, I read through all the pattern directions, and started cutting. Two of this, four of that, cut on the fold, fold the pattern, cut 3 of interfacing, it just seemed to go on and on. By the time I was finished cutting, I had accumulated 53 pieces. This total includes my two main prints, interfacing, and fusible fleece.


While it doesn't appear to amount to much in this picture, it was a backbreaking endeavor. Next stop, fusing....

Sunday, March 7, 2010

Crafty Road Trip

Normally at this time of the year, the weather in New England can be dark, dank, dreary, and dull (not to mention that there's the possibility of snow well into April). Finally the blanket of clouds parted and we were graced with the presence of a little bit of sunshine. This mini "heatwave" lent itself well to a crafty ROADTRIP.

In actuality, I really only drove 29.7 miles. But I live in Rhode Island, and the mindset here in the smallest state is that driving for more than 20 minutes is a big deals. My little crafty excursion was bordering on the verge of being called a "daytrip," to some.

So where did I go, you might ask. I finally made the trek to the Franklin Mill Store located in Franklin, MA. Normally I get most of my fabric from Joann Fabric. You really can't beat some of the prices, and I hoard those 40% off coupons like it's nobody's business. But being a Joann's shopper, also means that I miss out on some of the gorgeous designer fabrics from Amy Butler, Heather Bailey, Anna Maria Horner, etc...


source: Mattapoisett I.


Last summer after a bit of googling, I stumbled across the website for the Franklin Mill Store. It wasn't terribly far from where I live and they boasted that they sold many of these designer fabrics. I was intrigued....

So this week I happened to have nothing to do and some extra money to burn, so I talked my mom into driving "ALL THE WAY" into Franklin, MA. When we arrived, the sun was shining, birds were chirping, it was all meant to be.

We walked into this expansive mill space, and the first fabric display had a bunch of Amy Butler fabrics to choose from. I needed to pace myself! This was the first time that I really ever saw any of these designer fabrics in person at a store. I saw AB's new "Love" collection, and boy was I in love!

So as I sauntered throughout the whole store, I past through the quilting fabric, into the home dec rolls, and they also had a huge yarn selection. After I felt confident in the fact that I inspected very inch of the store, I went back to the quilting fabric to make my selections.

I was also purchasing the "Sweet Harmony" pattern by Amy Butler, so I figured I should buy the fabric to go along with it. After a lot of deep thought, soul searching, weighing pros and con, and being incredibly indecisive, I settled upon prints from Amy Butler's Midewest Modern 2 and Daisy Chain collections.


After paying for my wares, I was delighted to see that the incredibly friendly salesperson placed everything in a translucent bag and secured it with a pink ribbon.

A perfect end to a perfect day.....


PS - The Franklin Mill Store has a blog, . Check it out!